Starting Seeds Indoors: The Complete Guide for Beginners
Starting seeds indoors is a necessity for most gardeners, especially when germination times are long. If you've never tried it before, there are a few basics you need to know. We reveal how to get started!


Contents
Starting seeds indoors for the next growing season is an effective way to set your vegetable garden up for success. Indoor seed starting gives you greater control over your growing timeline, allows you to grow a wider range of plant varieties, and can significantly reduce your gardening costs.
By nurturing root systems before transplanting outdoors, young plants develop strength and resilience before the final frost arrives. Sowing seeds indoors also protects seedlings from harsh weather during their most vulnerable stage. When spring arrives, your vegetables, herbs, and flowers will already have established root systems, allowing them to grow vigorously and produce healthy vegetables, fragrant foliage, and abundant blooms.
The following sections explore the key benefits of starting seeds indoors compared to direct sowing outdoors or purchasing established plants.


Why Should I Start Seeds Indoors?

Setting up a germination station indoors before spring can save money, provide greater control over plant growth, and offer a rewarding gardening experience.
Seed packets cost far less than established seedlings from a garden center. Many materials needed for early sowing can be recycled household items such as egg cartons or toilet rolls, or reusable supplies that last year after year.
Starting seeds indoors also gives you control over the growing environment. You can manage light by placing seedlings in a south-facing window or by using supplemental grow lights to mimic natural sunlight. Regulate germination temperatures with a heat mat or by keeping seedlings in a consistently warm area of your home.
Frost-sensitive and half-hardy seeds benefit greatly from indoor sowing, as this extends the growing season rather than waiting for outdoor conditions to improve after the last frost. Allow seedlings to germinate and establish indoors before transplanting them outside. Even hardy varieties benefit from an indoor start, although they can also be direct sown outdoors.
Hardening off plants before moving them to their permanent outdoor location gives seedlings the best chance of success. Because plants need time to reach adequate size and strength for transplanting, starting seeds indoors makes good use of the slower winter months.
Indoor seed starting also allows you to grow heirloom varieties that local garden centers often do not stock. Ordering seeds from catalogs and starting them indoors greatly expands your planting options.
Many plants can also be grown as microgreens indoors, providing fresh, nutritious greens during the off-season.
Indoor Seed Starting Media
Choose a high-quality soil mix designed for starting seeds. The medium should be loose, drain well, and contain enough nutrients to support early growth. Soilless mixes are also available and work well for seed starting.
Poor drainage can lead to root rot and damping off, so keeping the growing medium from becoming overly wet is essential. Seedlings also need the right nutrient balance. Too much fertilizer too early often causes rapid leaf growth without adequate root development. Begin fertilizing once seeds sprout, keeping in mind that many seed-starting mixes already include slow-release nutrients.
Avoid using soil taken directly from the garden. Garden soil is often too dense, especially if it contains a high clay content, and may harbor diseases that can damage young seedlings. If clay soil is your only option, amend it heavily with organic materials such as compost to improve texture and drainage.
Using Seed Starting Mix or Soil

When purchasing a seed-starting mix, make sure the label specifies that it is formulated for seed starting. Potting mix is intended for container gardening, while seed-starting mixes are designed specifically for germination and early seedling growth.
These mixes are usually fine and lightweight, often containing slow-release fertilizer to support healthy sprouting. They typically include a blend of sifted soil, perlite, compost, and peat moss or a peat alternative such as coconut coir.
Most commercially available seed-starting mixes are pasteurized or sterilized. Always buy a fresh bag, as mixes that sit too long can develop fungus, mold, or other issues that harm seedlings.
Maintain clean workspaces, tools, and containers to reduce the risk of disease during seed starting. Practice good hygiene by cleaning tools and containers between uses. You can sanitize them using a solution of warm water and hydrogen peroxide to create a sterile environment for young plants.
Making Your Own Seed Starting Mix

To make a potting mix for propagation, sift compost through a screen after breaking up large chunks by hand. This seed-starting mix should remain light and fine rather than dense or chunky.
Combine one part sifted compost, one part coconut coir or peat moss, and one-half part perlite, which is a form of volcanic glass. Perlite improves drainage and prevents containers from becoming waterlogged, while coconut coir helps retain moisture where needed.
Some gardeners also add worm castings to provide gentle, slow-release nutrients. If desired, incorporate one part worm castings into the mix.
Using Coconut Coir or Peat Moss

Coconut coir is a peat substitute that has become popular in recent years. It comes from processed coconut husks prepared for planting use. Hydrate coir bricks, then mix them with sand or perlite and use the blend as a growing medium. When using coconut coir alone, add a liquid fertilizer to supply nutrients.
You can also use sphagnum peat moss, which provides a lightweight medium suitable for seed starting. Both materials work on their own as seed-starting media, but adding compost and perlite improves drainage and supplies better nutrition for developing seedlings.
Using Vermiculite

You can also sow seeds directly into vermiculite. This water-retaining mineral promotes fast germination when seeds are started indoors. However, vermiculite does not provide nutrients, so you need to transplant seedlings into soil as soon as the first or second true leaves appear.
Seed Starting Containers

There are many container options available for starting seeds indoors. Begin by looking at what you already have on hand. You can reuse food containers, packaging, or old pots. Compostable pots that can be planted directly into the ground also work well. Another option is rigid plastic seed-starting containers, which you can clean and reuse year after year.
Cell or Nursery Trays

Plastic propagation trays are a popular option for seed starting when paired with a seed-friendly potting mix. Their small, narrow cells encourage seedlings to develop strong root systems. You can clean these trays easily and reuse them year after year. Many come with a clear plastic dome that helps increase humidity during germination.
We like the Epic six-cell propagation trays sold through the Epic Gardening shop. Twelve of these trays fit neatly into a standard 10 x 20 tray. They are easy to move, and the large drainage hole at the base allows you to push seedlings out without damaging the roots. This design makes transplanting quick and simple.
Another option is large plastic cell sheets that you fill with growing medium and place into a 10 x 20 tray. These are available in many cell sizes, giving you plenty of flexibility depending on what you are growing.
Flat Trays

Flat seed trays work well for seeds that you’re sowing in large quantities, such as microgreens, or ones you can easily separate, like onions. They can also be used to hold blocks from a soil blocker.
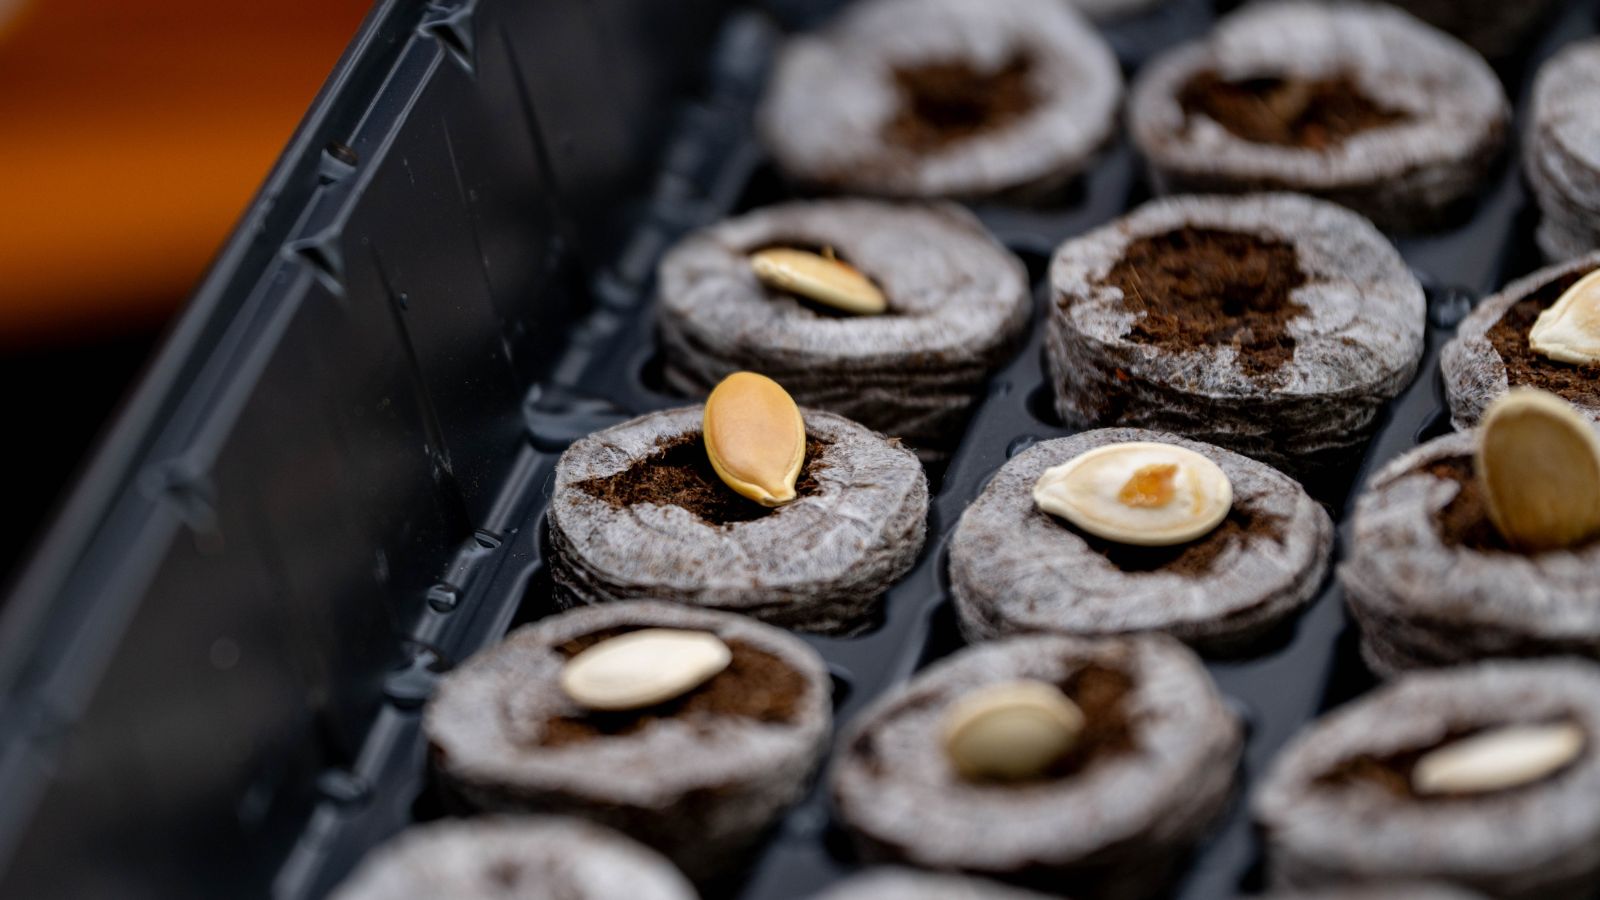
Pellets and Plugs

These offer a neat, tidy, and soilless way to start seeds. Pellets are small discs of compressed growing medium, usually made from peat moss or coconut coir. After hydrating them, place the pellets in a tray and sow seeds directly into the moist medium. Once seedlings develop sufficient growth, you can plant the entire pellet directly into the soil.
Root trainers are another type of propagation plug. They open along the side, which makes transplanting easy and reduces root disturbance. The interior design guides roots downward along small channels, encouraging strong, straight root development.
Fiber Mat
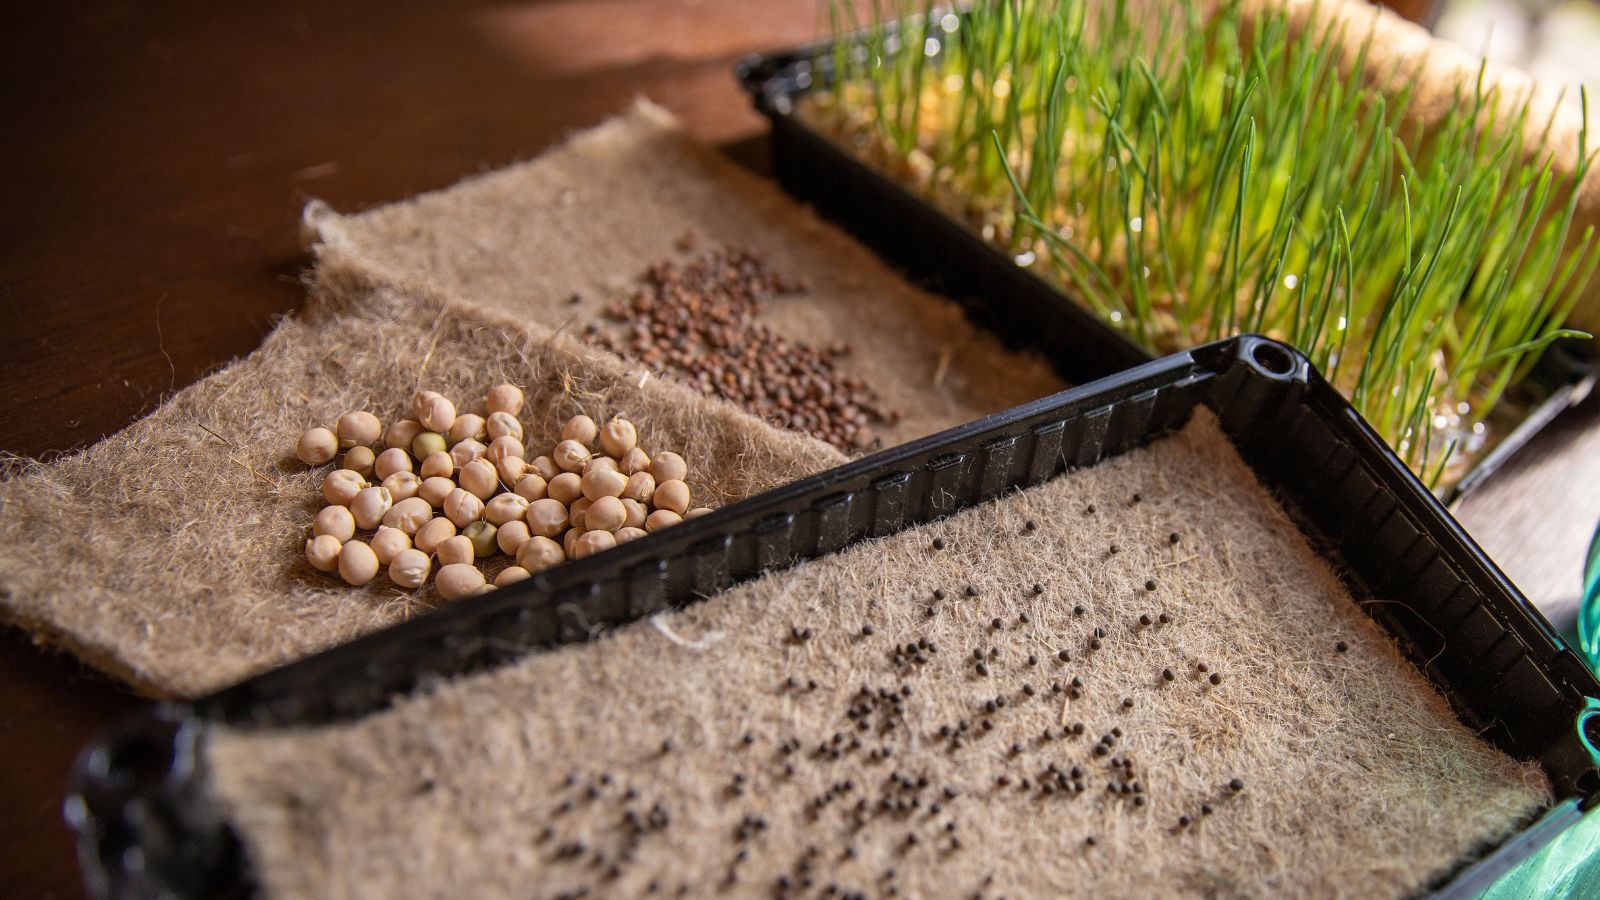
These are primarily used for microgreens or sprouting. Pre-soak the mat to hydrate it, and then spread seeds on top of it. Keep it moist during growth.
Small Pots

These containers work well for direct seeding or for transplanting seedlings as you harden them off before moving them outdoors. Many options are available, ranging from standard plastic or pottery containers to peat pots, manure pots, and coconut coir pots.
Peat pots, manure pots, and coconut coir pots can be planted directly into the garden. This makes them an excellent choice for plants with sensitive root systems or roots that do not tolerate disturbance well. Seedlings grow successfully in all of these container types.
Other Useful Equipment
Here are a few other products that might make your gardening go a bit more smoothly!
Heating Mats

Seeds need warmth to germinate successfully. If you live in a cold region where temperatures drop below freezing, place seedlings on heat mats to maintain consistent warmth. Many plants germinate best at temperatures of 70°F (21°C) or higher, so heat mats can also be useful in warmer climates where indoor temperatures fluctuate.

Grow Lights

Many plants need up to 16 hours of light once they sprout. Position lights directly above seedling trays to mimic natural sunlight. T5 fluorescent lights work particularly well, although many LED options also meet seedling lighting needs.
If you have a bright, sunny location, supplemental lighting may not be necessary, but it is still useful during the winter months. Take care, as some lights generate excess heat that can stress young seedlings.
Soil Blockers

This tool offers a practical way to start seeds without using pots. Begin with pre-moistened growing medium, place the tool over a pile of soil, compress it, then release the formed blocks into a tray. The result is compact soil blocks with built-in indentations for planting seeds.
When it is time to move seedlings outdoors, you can transplant these blocks directly into the garden. This method reduces plastic use and minimizes root disturbance during transplanting.
Plant Tags

We’ve all been guilty of forgetting what we planted! Use these to mark the date of planting and the variety.
How To Start Seeds

Sowing seeds varies by plant variety, so always follow the instructions provided on the seed packet to ensure proper depth, spacing, and germination conditions.
Preparation
Many seeds require pretreatment before sowing. For example, sweet peas benefit from soaking overnight or lightly nicking the seed coat to help them sprout more quickly. Some seeds germinate within a few days, while others can take two weeks or longer. Always check the seed packet for specific instructions.
Begin by gathering your supplies. Moisten your growing medium in advance or keep water nearby. For very small seeds, dampen the medium first so they do not wash away during watering. You can water larger seeds after planting. Always use containers with drainage holes to prevent excess moisture buildup.
Planting
A useful rule of thumb is to plant seeds at a depth equal to two times their size. Planting very small seeds can be tricky, and a hand seeder can help. You can also dampen a toothpick or your fingertip to pick up and place a single seed accurately.
Most gardeners sow two to three seeds per cell and thin them later. This approach improves germination success in case some seeds fail to sprout and also gives you the option of keeping multiple seedlings together for a fuller, bushier plant. For larger seeds, plant one seed per cell.
Fill containers generously with soil, as watering causes the medium to settle and compact. When adding soil, avoid packing it down too firmly, but press lightly to eliminate air pockets and create an even planting surface.
Care
Provide seedlings with good air circulation. Avoid keeping them overly wet, but maintain consistently moist soil. One way to check moisture levels is to lift the propagation tray and feel its weight. If the container feels very light and looks dry, water it. If it still feels slightly heavy, enough moisture remains. Do not allow seedlings to dry out completely.
Each vegetable or herb has a different germination timeline. Radishes may sprout within a few days, while pansies can take weeks to produce their first leaves. Label each container with a plant marker that includes the plant name and planting date. Always refer to seed packets for specific germination times.
Most seeds need darkness to germinate, so cover them with soil or even a sheet of paper. Place trays in a dark location until sprouts appear, then move them into the light. Some seeds require light to germinate, so double-check packet instructions before planting. After sprouting, plants need light to grow properly, especially as they develop their first true leaves.
If seedlings grow too close together, thin them to give each plant more space. Do this just before transplanting them into larger pots. Use snips to cut unwanted seedlings at the soil line to avoid disturbing the roots of the remaining plants.
Once seedlings develop true leaves, transplant them into a slightly larger container to allow continued growth. Avoid moving them into oversized pots, and increase container size gradually.
Before transplanting seedlings into the garden, begin the hardening off process. Take plants outdoors for short periods, gradually increasing exposure each day. This process helps seedlings adjust to outdoor conditions before planting them in their permanent location.
Frequently Asked Questions
Do you need a grow light to start seeds indoors?
Seedlings need 14-16 hours of sunlight and a sunny window cannot always provide enough. A south-facing window is ideal but if you are starting seeds in the winter in a cold, dark climate, you will need a grow light to ensure the best growth. Without the proper amount of light, the seedlings get leggy or don’t develop well.
Can all seeds be started indoors?
Some seeds can benefit from being directly sown outdoors and there’s no need to go to the effort of sowing them early inside. Timing is important here. If you have a short growing season, it is helpful to start plants indoors in the heat of your home or greenhouse so they can get a head start. Check the best practices for your climate or zone.


